Shopify Setup
This guide will walk you through the required steps on how to configure your Shopify store to work with Nitrogen. This setup process will take approximately 10-15 minutes.
Make sure to create a Partner account, as it allows you to create unlimited development stores for testing and streamlines your storefront setup process — all without needing a paid Shopify plan!
Storefront API
Once you have created a storefront, navigate to the Shopify App Store and download the Headless app. This will allow you to easily manage your Shopify Storefront API permissions and retrieve your Storefront API access token.
Make sure all
unauthenticatedStorefront API access permissions are enabled!
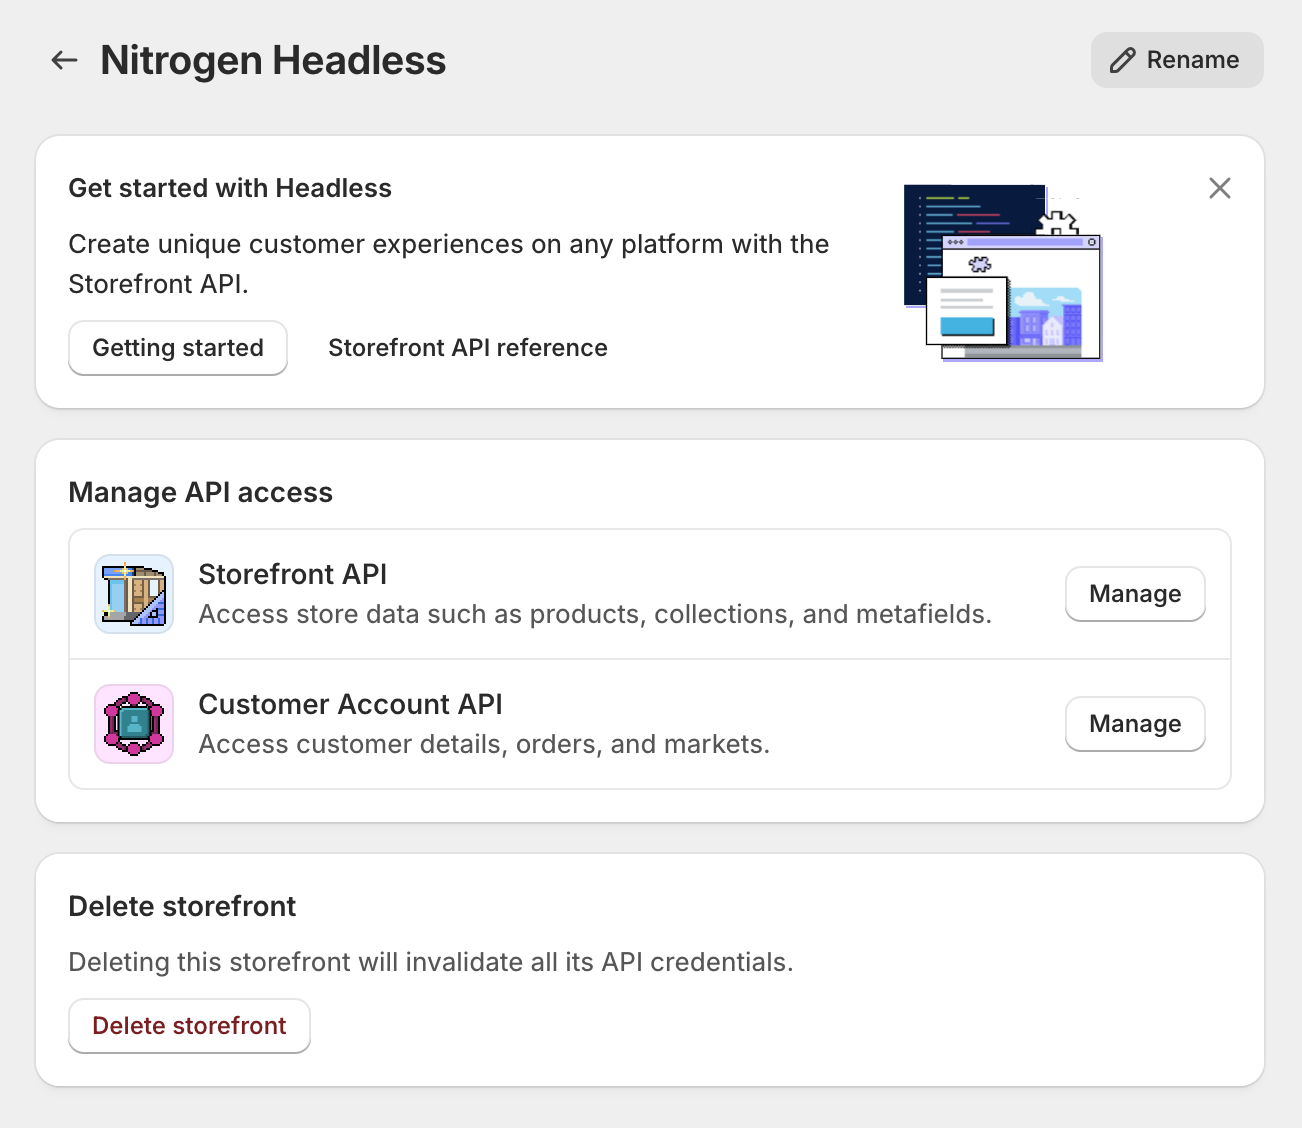
Admin API
Optionally, if want to extend your Shopify store further by adding logic only found within the Admin API, you must create a custom Admin app by navigating to Settings → Apps and Sales Channels → Develop Apps → Create an App. From there, configure the required Admin API permissions for your storefront and retrieve your Admin API access token.
API Permissions
After your apps are set up, you can add your store .myshopify domain, access tokens, and API version to your environment variables:
# Shopify
NUXT_SHOPIFY_DOMAIN=your-shop-name.myshopify.com
NUXT_SHOPIFY_ADMIN_ACCESS_TOKEN=your_admin_access_token
NUXT_SHOPIFY_STOREFRONT_ACCESS_TOKEN=your_storefront_access_token
NUXT_SHOPIFY_API_VERSION=2025-01
Localization
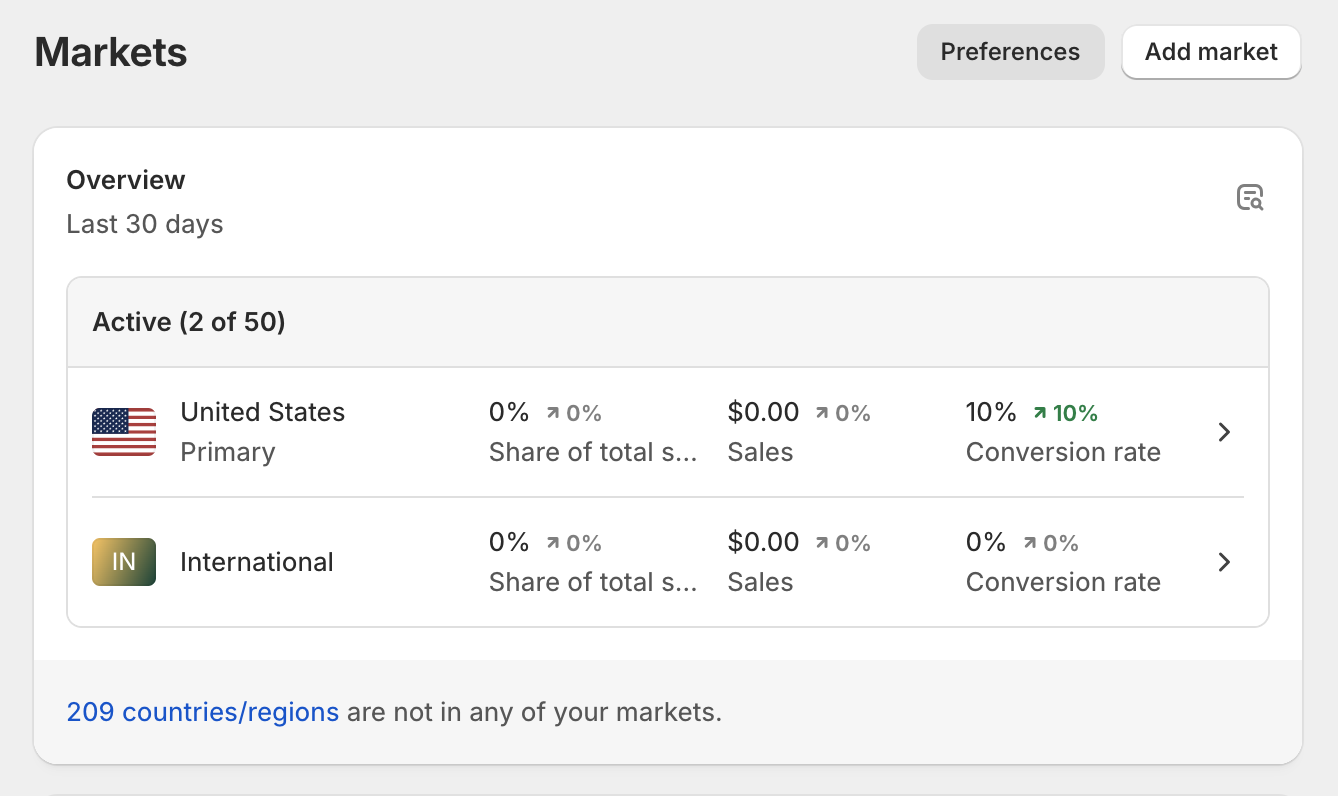
To support international currencies and localized experiences, navigate to Settings → Markets and configure your global currency markets by either selecting "International" or "Add Market". This allows customers to view prices in their local currency or switch between markets if needed.
Creating Products
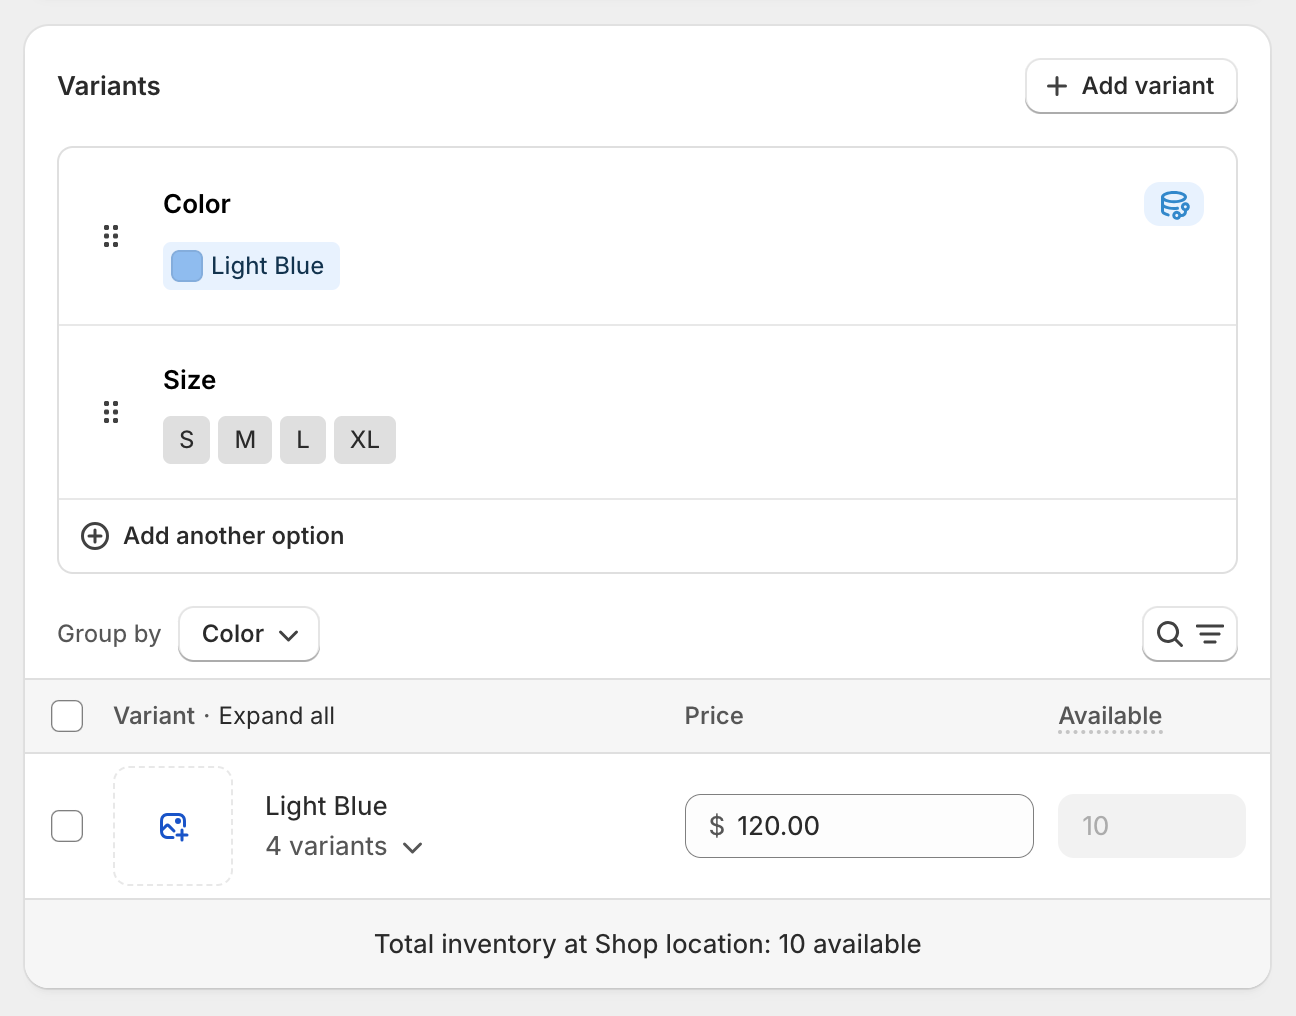
There are many ways to organize products in Shopify. For this specific project, I chose to have each product exist as a single SKU based on its color. This means that if a product has multiple color variations, each variation will exist as its own separate product. This approach allows each variation to display individually in collection grids and helps prevent variant bloat.
Generally, each product is recommended to have one Color variant option and a Size variant option with multiple values. However, it is perfectly fine for a product to have one or even zero variant options to work properly with this template.
Make sure to connect each
Colorvariant option to its category metafield by clicking the cylinder icon in the right-hand corner. When you connect a variant option to a category metafield, it enables the use of color swatches for that variant!
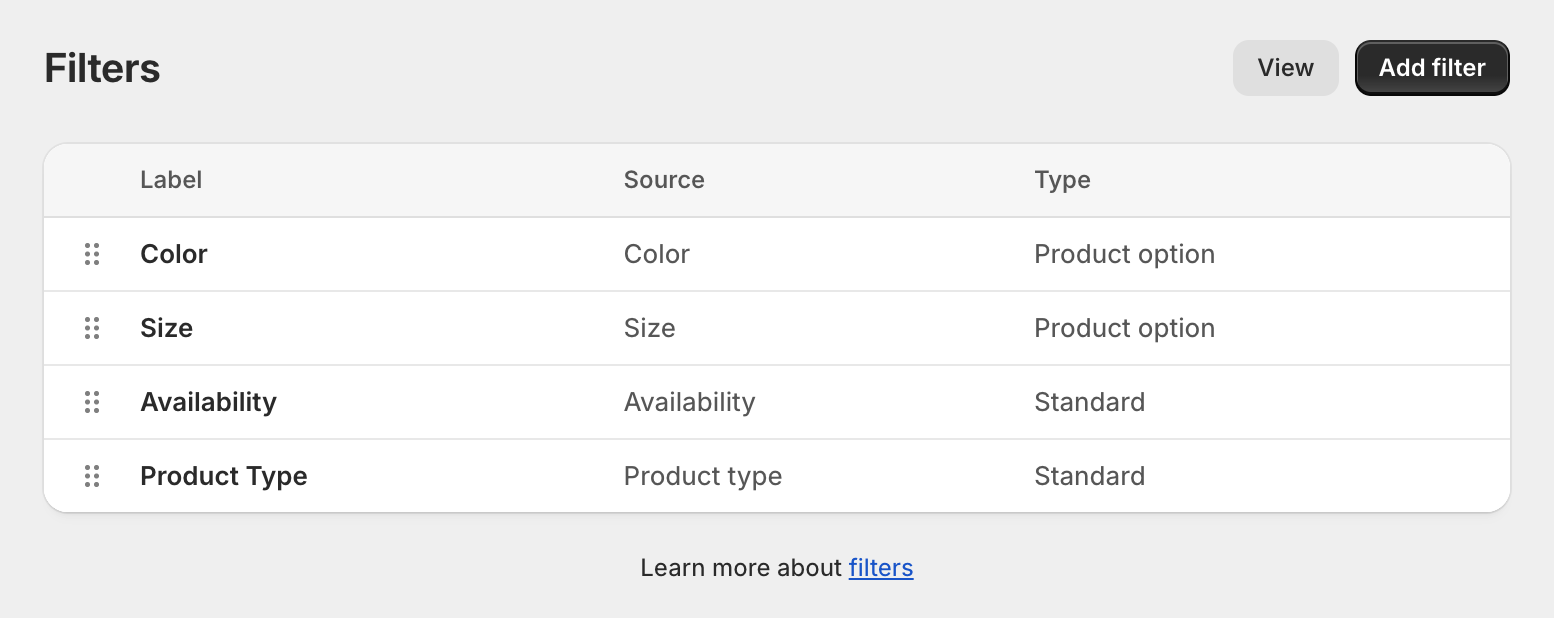
Filtering Products
To enable filter and sort functionality, install the Shopify Search & Discovery app. Once installed, navigate to Apps → Shopify Search & Discovery → Filters and set up basic filter options. You'll likely need to remove some default options or add more if needed. This template uses the Availability, Color, Size, and Product Type filter options.
Metaobjects
This template uses metaobjects to create unique store objects that can be connected to metafields. The filter component, in particular, makes use of a Color Swatch metaobject to filter products by general color name, hexcode, or image. This is especially helpful when a color has varying shades or a specific, non-standard name, as it can be associated with a general color swatch that users recognize.
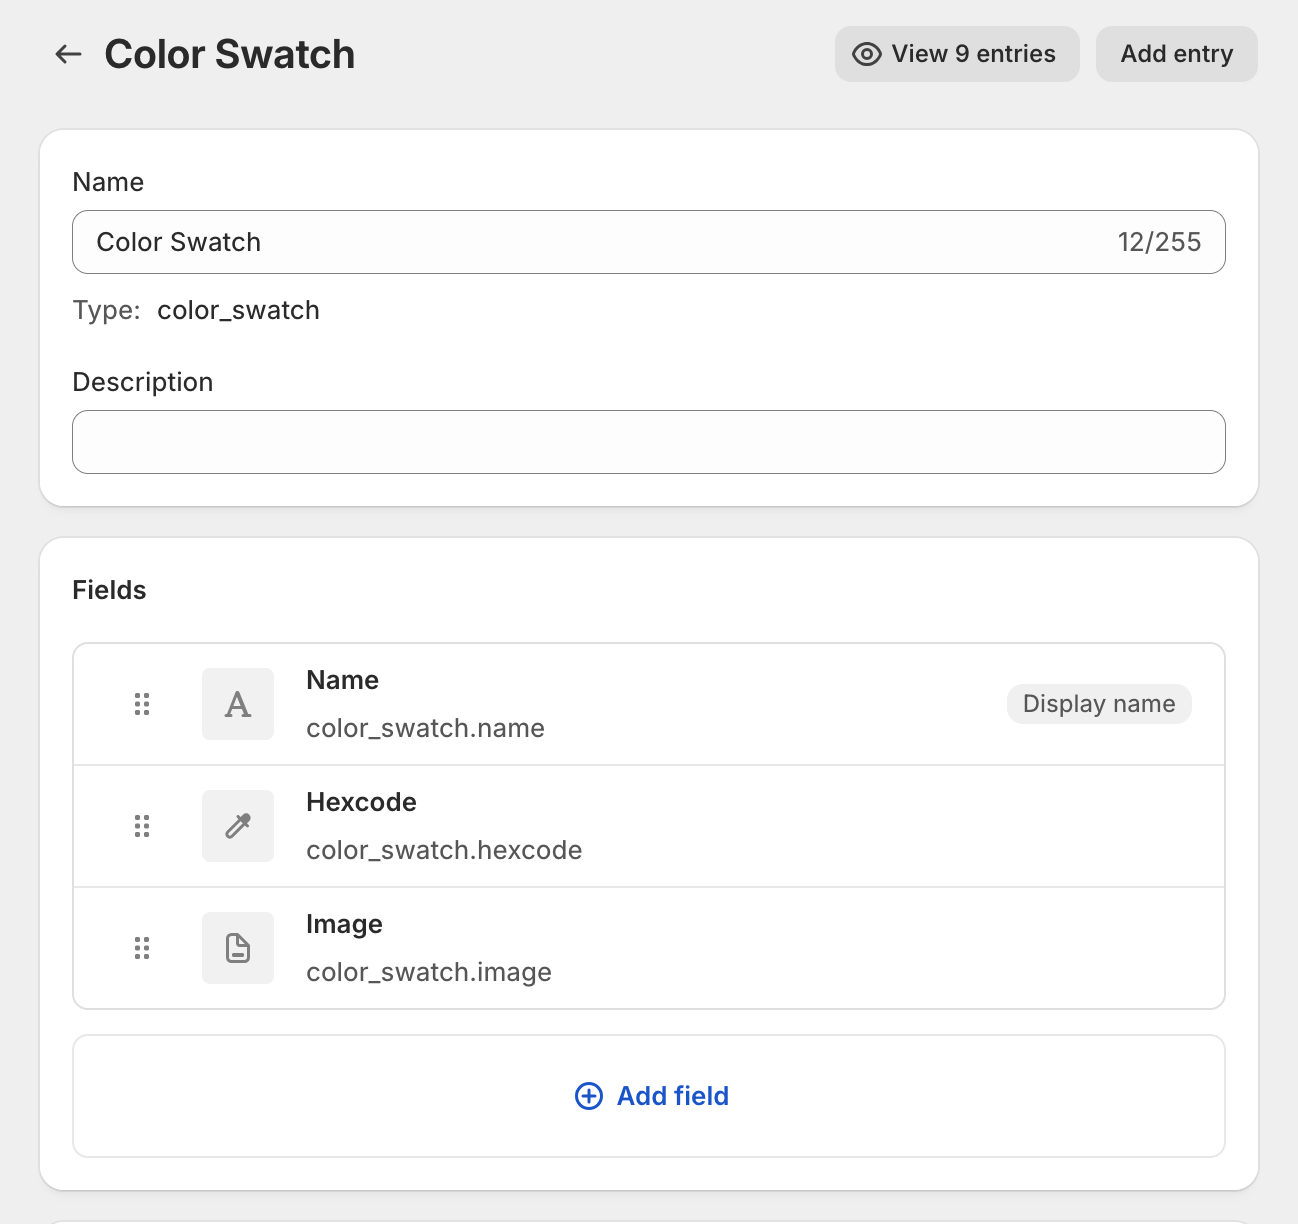
To create the Color Swatch metaobject, navigate to Settings → Metafields and Metaobjects and click "Add Definition" at the bottom of the page. Name it "Color Swatch" and add the following field definitions:
name: Single line text (one value). This represents the general swatch color name.hexcode: Color (one value). This allows you to specify a custom hex code for the swatch color.image: File (one value). This enables you to upload an optional image to display as the swatch color.
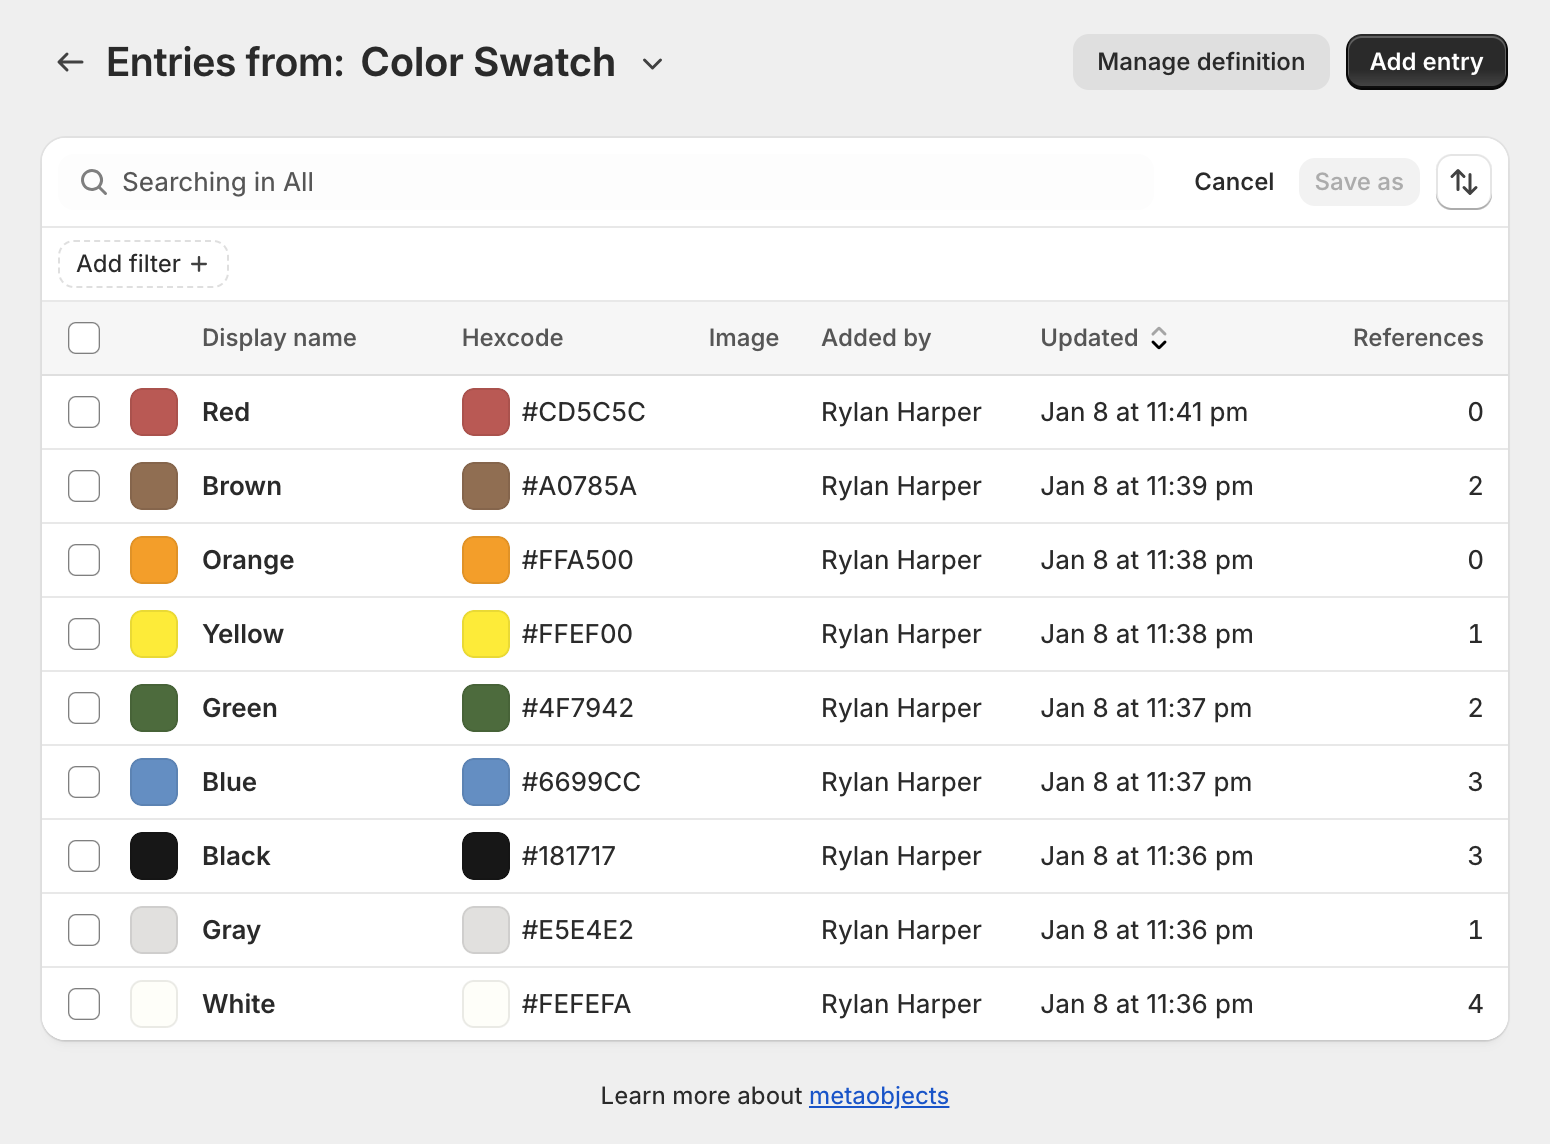
After defining these fields, navigate to Content → Metaobjects. You will see your newly created Color Swatch metaobject. Click into it, then click "Add Entry" in the top-right corner to create your general color swatches with names, hex codes, and optional images.
Note that your
Color Swatchentries do not need to match my example.
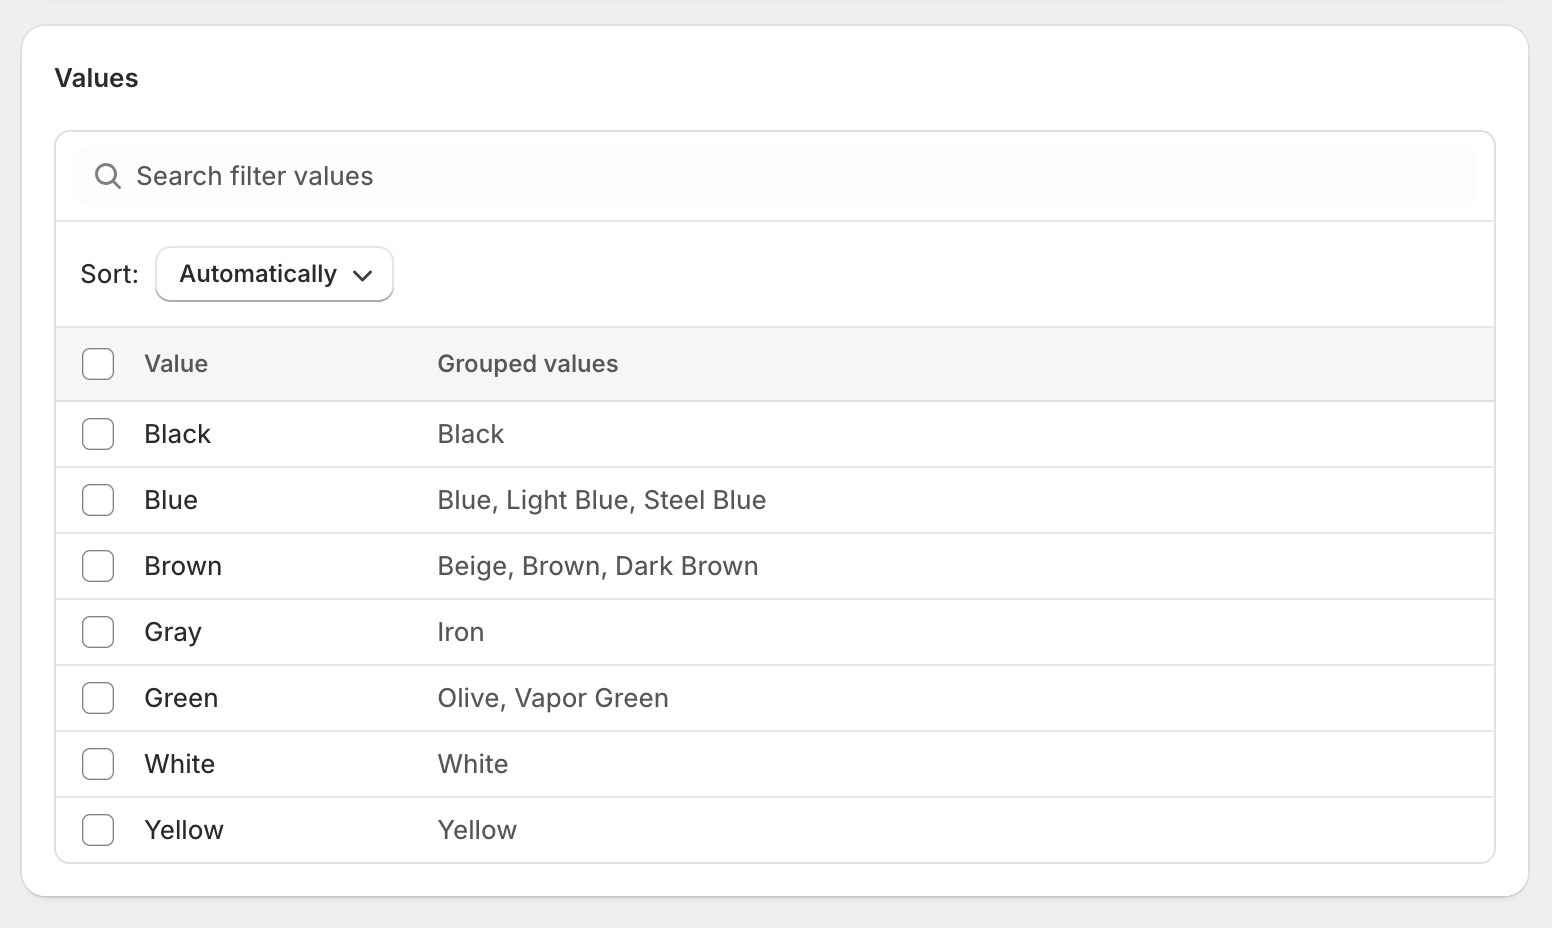
Once this is completed, navigate to Shopify Search & Discovery → Filters → Color and group your product color option names (if any exist) under the same general color names defined in the Color Swatch metaobject entries. This ensures consistent and user-friendly filtering for your store.
Metafields
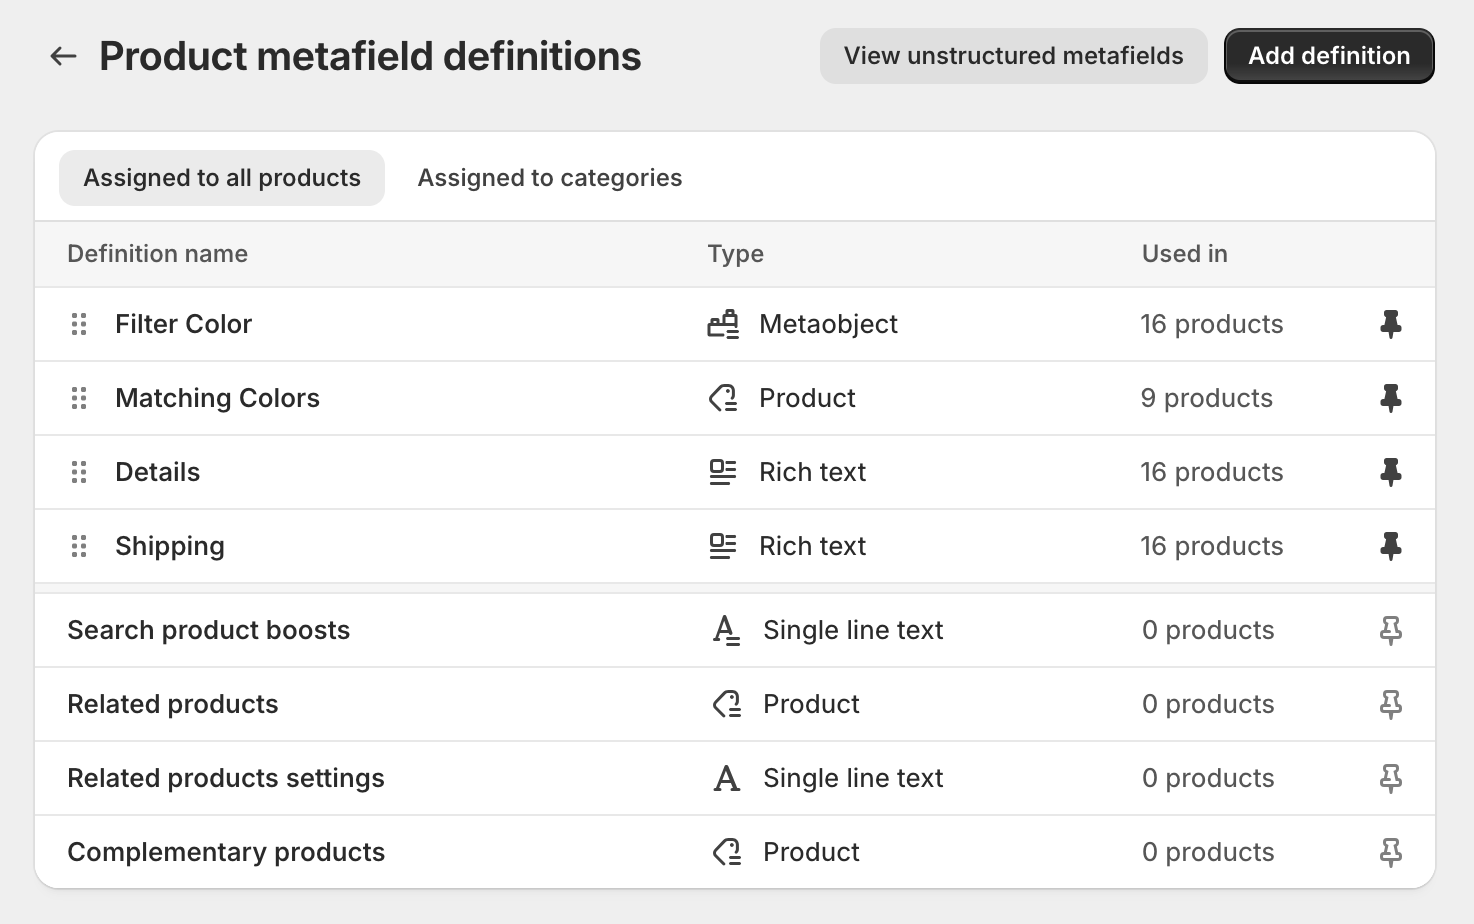
This template uses metafields to make working with custom data in Shopify easier. To enable product metafields, navigate to Settings → Metafields and Metaobjects → Products and add the following product metafield definitions:
filter_color: This is a metaobject (list of entries) metafield that references theColor Swatchmetaobject. Ensures general color names, hexcodes, or images can be associated with a product for filtering on collection pages.matching_colors: This is a product (list of products) metafield that connects to products with matching colors. Provides full access to the referenced product's data, which is ideal for checking availability, options, media, and more.details: This is a rich text metafield for displaying additional product details, such as specifications, materials, or care instructions. Used to enrich product descriptions and provide product-specific information to customers.shipping: This is a rich text metafield for sharing shipping information, like delivery timelines, restrictions, or return policies. Ideal for ensuring customers quickly know all the necessary shipping info before purchasing.
Once created, these metafields will now be accessible at the bottom of each product page for you or your team to edit.
Customer Accounts
In order to set up customer account functionality, make sure that all API permissions under Customers are enabled within your main Headless app. Next, navigate to Notifications → Customer Notifications → Customer Account Password Reset and click "Edit Code". Find the "Reset your password" button and replace the <a> tag with the following:
{% assign url_parts = customer.reset_password_url  | split: '/' %}
<a href="https://your-site-domain.com/account/reset?id={{url_parts[5]}}&token={{url_parts[6]}}" class="button__text">Reset your password</a>
This will redirect password reset emails to your custom domain while maintaining the necessary security parameters.